Wave Function Collapse Algorithm in ClojureScript
The last time I touched ClojureScript was almost two years ago. It was a really fun experience, and actually, it was a bit special to me personally. Prior to that post, I only learned lisp1 via books and mostly used it only for configuring Emacs, and while I’ve liked the idea of code as data and other lisp aspects, I never did anything more with the language. So this was the first thing that I’ve done in lisp from start to finish, the first thing done in Clojure, the first interactive thing with some sort of visualizations. And this is pretty much the reason I fell in love with Clojure and not with another dialect - I’ve used it for something real, not just an exercise for the book, and I liked the syntax, the data structures, immutability, laziness, and other features. Since that post I’ve got a job in Clojure, so now it’s my primary programming language and I love it still. However, I have a lot less experience with ClojureScript, mainly because I mostly do backend development, and we have a separate team working on the frontend part.
I like games, but I’ve never actually done anything more than simple demos of various game algorithms and techniques2. And I mostly did it in Fennel, because it’s also a very nice lisp-like language with a very similar syntax to Clojure. I wanted to do more, but I wanted these experiments to be a bit more reachable, and possibly viewed directly in my blog, as it was with the raycasting example. So I knew that I wanted to do something with ClojureScript instead of Fennel, which became my main language for this type of thing. Another reason is that I’m thinking about doing some frontend programming in ClojureScript in the upcoming years.
Luckily for me, not so long ago I found a really neat algorithm for generating worlds. The algorithm is called Wave Function Collapse, and it actually has nothing to do with quantum physics. In this post, I’ll try to walk you thru the algorithm, and explain how I’ve approached this problem.
The algorithm
What makes this algorithm different from most procedural generation algorithms I’ve read about is that it is extremely simple. It can generate images based on a small sample of data, as shown below:
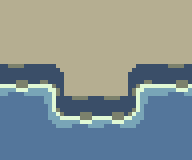
Figure 1: Example Input
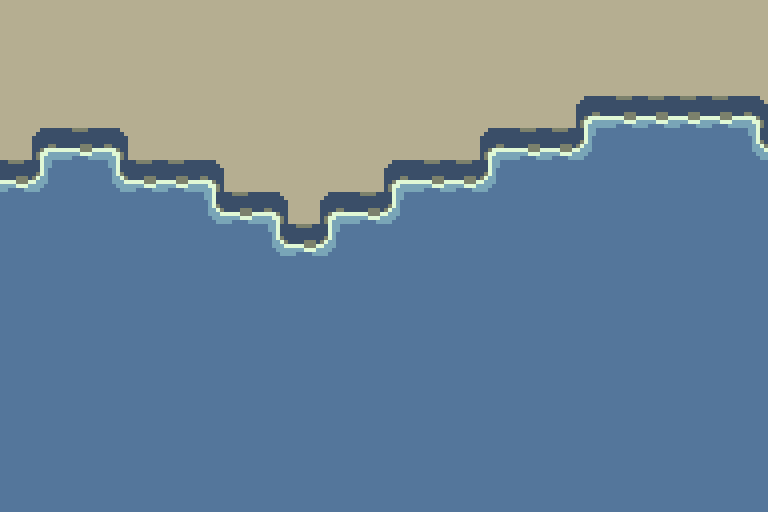
Figure 2: Generation result
However, just implementing the algorithm from some description isn’t fun. What I like to do, and this is a general approach I use for all my projects, is to get some assumptions about the thing I want to implement, and then do everything based on these assumptions only3. So instead of learning how the algorithm is implemented, I’ve just observed its behavior with simple input.
For example, let’s look again at the input sample, but let’s split it into tiles with a grid:
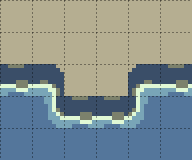
Figure 3: Sample
This sample specifies that for each tile on this image there are only so many possible neighbors. For example, this tile in the middle can only have one unique neighbor on each of its sides:
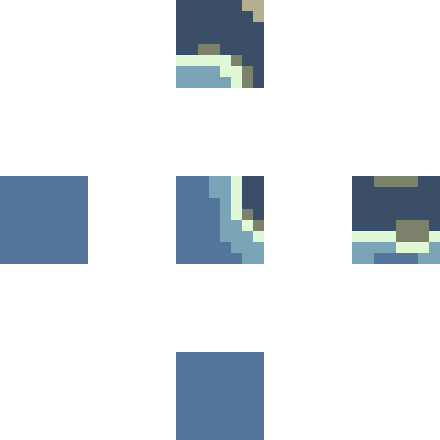
Other tiles may have two or more unique neighbors, and the job of the algorithm is to analyze each tile on the image, and track what neighboring cells it has, storing it into a ruleset. And an image is then generated based on these adjacency rules only.
This is basically what I knew about the algorithm when I started implementing it. Of course, it’s not that simple, but it’s still easy to grasp, and some nuances become apparent when you actually start working on it. I’ll give the algorithm a more comprehensive explanation a bit later, as we’ll encounter problems.
Text version of the algorithm
For this project, I once again picked shadow-cljs, so the project can be created with npx create-cljs-project wave-function-collapse.
But before actually working with images we can begin with a bit simpler to debug version of it which deals with an ordinary text.
This can be done in plain Clojure, but since we’ll later plug it into our page, let’s use .cljs file.
We start by implementing our algorithm in the file wfc.cljs, wfc being short for wave function collapse.
As I’ve explained in the previous section, we start by transforming an input into a set of rules for the algorithm. Our input will be a two-dimensional matrix, in this case, an array of arrays of strings. Let’s start with a similar sample to that I’ve shown in the previous example:
(def coast
  [["🟫" "🟫" "🟫" "🟫"]
   ["🟩" "🟫" "🟫" "🟩"]
   ["🟦" "🟩" "🟩" "🟦"]
   ["🟦" "🟦" "🟦" "🟦"]])
It’s even simpler, as it doesn’t have tiles that represent corners. The first thing we need to do is to define a function, that gets all neighboring cells in all cardinal directions:
(defn get-neighbors [m x y]
  (->> {:up [(dec x) y]
        :down [(inc x) y]
        :left [x (dec y)]
        :right [x (inc y)]}
       (into {}
             (keep (fn [[dir pos]]
                     (when-some [cell (get-in m pos)]
                       [dir {:pos pos :cell cell}]))))))
This function gets only those cells inside our matrix and discards those that are outside of its boundaries. With this function we can write a function that builds a recipe from the input sample:
;; add [clojure.set :as set] to :require
(defn build-recipe [sample]
  (->> sample
       (map-indexed
        (fn [x r]
          (map-indexed
           (fn [y c]
             (let [neigbors (into {}
                                  (map (fn [[dir {:keys [cell]}]] [dir #{cell}]))
                                  (get-neighbors sample x y))]
               {c neigbors})) r)))
       flatten
       (apply merge-with #(merge-with set/union %1 %2))))
I’m using map-indexed because we need to get neighbors for each cell, and this is what our get-neighbors function accepts.
Calling this function on the coast recipe yields the following map:
{"🟫" {:up #{"🟫"}
       :down #{"🟫" "🟩"}
       :left #{"🟩" "🟫"}
       :right #{"🟫" "🟩"}}
 "🟩" {:up #{"🟫"}
       :down #{"🟦"}
       :left #{"🟫" "🟦" "🟩"}
       :right #{"🟫" "🟦" "🟩"}}
 "🟦" {:up #{"🟩" "🟦"}
       :down #{"🟦"}
       :left #{"🟩" "🟦"}
       :right #{"🟦" "🟩"}}}
Now we have a proper illustration of the adjacency rules we’ve talked about before. With that, we can start implementing the algorithm itself.
Collapsing cells
In order to collapse anything, we need a world in which we’ll do our work. The beauty of this algorithm lies in the fact that it can work with a partially filled world, but generally, the world starts in a so-called superposition. To get this superposition, we need to analyze the input sample once again:
(defn get-superposition [sample]
  (into #{} (flatten sample)))
This gives us all possible variants for a single cell. To define a world we can just generate a new “empty” matrix that we’ll later populate with a cell superposition state.
(defn gen-world [max-x max-y]
  (mapv vec (for [_ (range max-x)]
              (for [_ (range max-y)] nil))))

(defn populate-world [world sample]
  (let [superpos (get-superposition sample)]
    (mapv (fn [r] (mapv (fn [c] (if (nil? c) superpos c)) r)) world)))
As the last preparation step, we need a way of checking if the world is fully built. This can be done by checking if any of the cells is still a hash-set and not a concrete value:
(defn done? [world]
  (not (some set? (flatten world))))
A more optimal way would be to track how many cells were fully collapsed and compare it with the world size to avoid walking the whole world repeatedly on each step, but for now, this will do. The last preparation step we need to do is to write a function that chooses which cell to collapse next. The first cell can be selected at random, but the following must be selected more carefully, or we’ll corner ourselves pretty quickly. To do that we need to measure world entropy and select a cell with the lowest one. Since every cell can only contain a set of unique elements, we can measure the entropy by counting the number of elements in a cell. Thus, a function that returns the lowest entropy cell can be defined as follows:
(defn lowest-entropy-cell [world]
  (let [enthropies (->> world
                        (map-indexed
                         (fn [x r]
                           (keep-indexed
                            (fn [y cell]
                              (when (set? cell)
                                [(count cell) [x y]])) r)))
                        (apply concat)
                        shuffle
                        (sort-by first))]
    (if-some [c (first enthropies)]
      (second c)
      [0 0])))
This will produce uniform distribution, so we might want to change it a bit later, but for now, it’ll do.
Now to the meat and bones of the algorithm. To actually collapse a cell we need a function that can choose a random element of a cell:
(defn collapse
  [world x y val]
  (if (and (coll? val)
           (= 1 (count val)))
    (assoc-in world [x y] (first val))
    (assoc-in world [x y] val)))
After the cell is collapsed, we need to constrain its neighbors, so their superposition only contained possible elements that can be connected to this cell. This is a bit harder part of the algorithm, as it involves waling a grid of cells recursively and constraining every cell that is a set and skipping others that are not. If a cell itself is a set, its content should be treated as a series of cells that also affect how the surrounding cells should be constrained:
(defn collapse-neighbors
  [world recipe x y]
  (let [cell (get-in world [x y])
        neighbors (get-neighbors world x y)
        neighboring-cells (shuffle (map :pos (vals neighbors))) ; ❶
        world' (reduce
                (fn [world [dir {[x' y' :as pos] :pos}]]
                  (let [c (get-in world pos) ; ❷
                        variants (set/intersection
                                  (if (coll? c) (set c) #{c})
                                  (if (set? cell)
                                    (apply set/union (map #(get-in recipe [% dir]) cell))
                                    (get-in recipe [cell dir])))] ; ❸
                    (if (and (set? c) (seq variants))
                      (collapse world x' y' variants) ; ❹
                      world)))
                world neighbors)]
    (if (= world' world)
      world
      (reduce (fn [world [x y]]
                (collapse-neighbors world recipe x y))
              world' neighboring-cells)))) ; ❺
This function is the heart of the algorithm, as it does all of the heavy liftings on constraining cells, so let’s break it down.
First, we get all neighbors and extract a sequence of cells that we’re going to constrain (❶).
We then iterate over these neighbors inside reduce, getting the current world state for this cell (❷).
For this cell, we need to compute all remaining variants.
This is done by intersecting this cell’s state with variants from a neighbor in a given direction.
And if the cell itself is a set, this is done for each element in a set (❸).
Finally, a cell is collapsed (❹), except when it was a set and the variant list wasn’t empty.
After that process is done for all four neighbors, we need to repeat it for each of the neighbors’ neighbors. So we check if our last run actually produced any change in the world, and if it is, we recursively walk through these neighbors (❺), otherwise, we return current world state. This may actually cause a stack overflow error if there are too many neighbors to collapse, which depends both on the world size and how general the recipe is. To avoid that, this function can be turned into iterative, but it still will maintain the stack of neighbors to collapse, which will grow in memory, instead of on a stack. I’ve decided to go with recursion, as it’s a bit easier to understand in the context of the post.
The last bit needed is a loop that will repeat this process until the whole world is collapsed. The process is:
- pick a cell with the lowest entropy, first one is random
- collapse it
- constrain neighbors
- check if not done
- repeat
Here’s the code:
(defn wfc [world sample]
  (let [recipe (build-recipe sample)]
    (loop [world (populate-world world sample)
           [x y] [(rand-int (count (first world)))
                  (rand-int (count world))]]
      (if-not (done? world)
        (let [cell (get-in world [x y])
              world (-> world
                        (collapse x y (rand-nth (vec cell)))
                     (collapse-neighbors recipe x y))]
          (recur world
                 (lowest-entropy-cell world)))
        world))))
Now, we can actually try it! Let’s create some helpers, that will print the resulting world, and the input recipe:
;; add [clojure.string :as str] to :require

(defn print-sample [sample]
  (->> sample (map str/join) (str/join "\n") (println)))

(defn print-world
  ([world] (print-world world ""))
  ([world sep]
   (->> world
        (map #(map (fn [c] (if (set? c) "?" c)) %))
        (map #(str/join sep %))
        (str/join "\n")
        (println))))

(defn print-result [sample world]
  (println "sample:")
  (print-sample sample)
  (println "gen:")
  (print-world world))
Now, if we use our coast recipe, we should see this in our REPL:
wfc.wfc> (print-result coast (wfc (gen-world 16 16) coast))
sample:
🟫🟫🟫🟫
🟫🟫🟫🟫
🟫🟫🟫🟫
🟫🟩🟩🟫
🟩🟦🟦🟩
🟦🟦🟦🟦
🟦🟦🟦🟦
gen:
🟫🟫🟫🟫🟫🟫🟫🟫🟫🟫🟫🟫🟫🟫🟫🟫
🟫🟫🟫🟫🟫🟫🟫🟫🟫🟫🟫🟫🟫🟫🟫🟫
🟫🟫🟫🟫🟫🟫🟫🟫🟫🟫🟫🟫🟫🟫🟫🟫
🟫🟫🟫🟫🟫🟫🟫🟫🟫🟫🟫🟫🟫🟫🟫🟫
🟫🟫🟫🟫🟫🟫🟫🟫🟫🟫🟫🟫🟫🟫🟫🟫
🟫🟫🟫🟫🟫🟫🟫🟩🟫🟫🟫🟫🟫🟫🟫🟫
🟫🟫🟫🟫🟫🟫🟩🟦🟩🟫🟫🟫🟫🟫🟫🟫
🟫🟫🟫🟫🟫🟩🟦🟦🟦🟩🟫🟫🟫🟫🟫🟫
🟫🟫🟫🟫🟩🟦🟦🟦🟦🟦🟩🟩🟫🟫🟫🟫
🟫🟫🟫🟩🟦🟦🟦🟦🟦🟦🟦🟦🟩🟫🟩🟩
🟫🟫🟩🟦🟦🟦🟦🟦🟦🟦🟦🟦🟦🟩🟦🟦
🟩🟩🟦🟦🟦🟦🟦🟦🟦🟦🟦🟦🟦🟦🟦🟦
🟦🟦🟦🟦🟦🟦🟦🟦🟦🟦🟦🟦🟦🟦🟦🟦
🟦🟦🟦🟦🟦🟦🟦🟦🟦🟦🟦🟦🟦🟦🟦🟦
🟦🟦🟦🟦🟦🟦🟦🟦🟦🟦🟦🟦🟦🟦🟦🟦
🟦🟦🟦🟦🟦🟦🟦🟦🟦🟦🟦🟦🟦🟦🟦🟦
We can try with a bit more interesting examples, like these trees:
(def snowy-trees
  [["*" " " " " " " " " "*" " " " "]
   [" " " " " " " " " " " " " " "*"]
   [" " " " "*" "╱" "╲" " " "*" " "]
   ["*" " " "╱" "v" "v" "╲" " " " "]
   [" " "╱" "v" "v" "v" "v" "╲" " "]])
wfc.wfc> (print-result snowy-trees (wfc (gen-world 16 60) snowy-trees))
sample:
*    *
       *
  *╱╲ *
* ╱vv╲
 ╱vvvv╲
gen:
 *  *  *   *   *      *   *     *    *   *  * *    * *  *  *
   *  *  *    * * * *   *  * *    *    *     *  * * *  *
 *      *      *              *  *       * *   *   *  * * *
  * * *   *   * * *  * *  *     *    * *  *   * *      * *
 *   *   *   * *   *  *  *  * *  *  *   *  * * * *        *
   *    *  *      *       *  *  *  *  *  *    * * *
 *        * * *  *  *  * *     *  * *     * *      * * * * *
  *  *  *    *  * *  *     *  *  * *  *  * *    *   *   * *
         * *   * * *      *    *  *     * *  * *  ╱╲  *  *
   *  * * *   *       *  *    *      *        * *╱vv╲  *   *
*   *  *   * *     * * *   *     *  *  * *  *  *╱vvvv╲
  *   *   * *   * *     *   *   *  *    * *  * ╱vvvvvv╲
 *  *   *     *   ╱╲ *    *   *   *  ╱╲  *  * ╱vvvvvvvv╲ *
         *     * ╱vv╲ *  *  ╱╲ * * *╱vv╲   * ╱vvvvvvvvvv╲ *
 *   *     *    ╱vvvv╲  * *╱vv╲ * *╱vvvv╲ * ╱vvvvvvvvvvvv╲
*  ╱╲ *  ╱╲  * ╱vvvvvv╲   ╱vvvv╲ *╱vvvvvv╲ ╱vvvvvvvvvvvvvv╲
Noticeable, the spread is too uniform. This is because we pick a random choice, and the choices have equal distribution. Instead, it’d be nicer if we had a bit more control over what elements are more present and what is less present.
To do that, we need to replace our random choice picking with weighted random. First, we need to calculate the weights:
(defn sample-weights [sample]
  (frequencies (apply concat sample)))
This will do - the more times a certain tile appears in a recipe, the higher its weight is. Now we need a weighted random:
(defn weighted-random [elements weights]
  (let [variants (reduce (fn [m k] (assoc m k (weights k))) {} elements)
        weights (reductions #(+ % %2) (vals variants))
        rnd (rand-int (last weights))]
    (nth (keys variants) (count (take-while #(<= % rnd) weights)))))
And now, that we have weights, we can upgrade our lowest-entropy-cell function to take weights into account when calculating the entropy.
We also use a better entropy calculation algorithm, based on Shannon entropy:
(defn cell-enthropy [cell weights]
  (let [weight-sum (reduce + (map #(get weights %) cell))
        log-weight-sum (reduce + (map #(let [weight (get weights %)]
                                         (* weight (Math/log (double weight)))) cell))]
    (Math/log (- weight-sum (/ log-weight-sum weight-sum)))))

(defn lowest-entropy-cell [world weights]
  (let [enthropies (->> world
                        (map-indexed
                         (fn [x r]
                           (keep-indexed
                            (fn [y cell]
                              (when (set? cell)
                                [(cell-enthropy cell weights) [x y]])) r)))
                        (reduce into (sorted-map)))]
    (if-some [[_ c] (first enthropies)]
      c
      [0 0])))
The last change needed is in the wfc function - we need to use weighted-random when we collapse a cell:
(defn wfc [world sample]
  (let [recipe (build-recipe sample)
        weights (sample-weights sample)]
    (loop [world (populate-world world sample)
           [x y] [(rand-int (count (first world)))
                  (rand-int (count world))]]
      (if-not (done? world)
        (let [cell (get-in world [x y])
              world (-> world
                     (collapse x y (weighted-random cell weights))
                     (collapse-neighbors recipe x y))]
          (recur world
                 (lowest-entropy-cell world weights)))
        world))))
Now the algorithm is done, and we can see that the snowy-trees example has a bit less snow now:
wfc.wfc> (print-result snowy-trees (wfc (gen-world 16 60) snowy-trees))
sample:
*    *
       *
  *╱╲ *
* ╱vv╲
 ╱vvvv╲
gen:
   *    *    *   *  *       *      *           * *         *
  *        *    *         *     *       *       * *   * *
       *      *        *   *         *    *   *    *   *
   *                *        *     *  *    *     *   *   *
*             *  * *      *          *       *
           *           *   *    *       * *             *  *
              *  *    *            *   *      *      *
    *     *  *     * *     *    *    *     *           * *
   * *     *          * *   *  *
          *    *       *  *       *   * *   *     *  * *
  * *       * *    * *   *     *   * * *            *   *
       *   *    *                 *      *        ╱╲ *     *
      *      *        * *            *      *  * ╱vv╲
     * ╱╲            *    * *          *  *     ╱vvvv╲
      ╱vv╲   ╱╲  *       *      *        *  *  ╱vvvvvv╲
  *  ╱vvvv╲ ╱vv╲   ╱╲  *  * *           * *  *╱vvvvvvvv╲  *╱
Working with images
At the beginning of this article, I’ve shown you an image of a coast. This image is generated by the code above, but right now it can’t handle images, only text. This isn’t a problem, really, because the text is just used in place of unique identifiers, so we can plug in anything, and then use the resulting world as a recipe to paint it on a canvas. Let’s do exactly that, but before we can do it, we need to be able to upload an image and splice it into tiles.
To do that, we’ll need an index.html file in our public/ directory, and a <canvas> tag in it with an appropriate id:
<canvas id="sample_view" width="512" height="512"></canvas>
<input type="file" id="sample_input" accept="image/*"></input>

<script type="text/javascript" src="/js/main.js"></script>
<script>
  window.onload = function() {
    wfc.core.init();
  }
</script>
I’m also adding an <input> tag, to open an image.
Additionally to that, there should be the <script> tag that loads our core module and runs the init function.
With this in place, we can add an event listener to the button, and load the image to canvas.
In core.cljs add:
(ns wfc.core
  (:require [wfc.sample :as sample]))

(defn ^:export init []
  (when-let [sample-input (.getElementById js/document "sample_input")]
    (.addEventListener sample-input "change" sample/upload)))
And in sample.cljs create the upload function:
(defonce ^:dynamic *image* {:image nil
                            :width 0
                            :height 0})

(defn draw [event]
  (when-let [viewer (.getElementById js/document "sample_view")]
    (let [image (js/Image.)
          ctx (.getContext viewer "2d")
          handler (fn []
                    (let [width (.-width image)
                          height (.-height image)]
                      (set! *image* {:image image
                                     :width width
                                     :height height})
                      (set! (.-width viewer) width)
                      (set! (.-height viewer) height)
                      (.clearRect ctx 0 0 (.-width viewer) (.-height viewer))
                      (.drawImage ctx image 0 0)))]
      (.addEventListener image "load" handler)
      (set! (.-src image) (-> event .-target .-result)))))

(defn upload [event]
  (when-let [files (-> event .-target .-files)]
    (let [reader (js/FileReader.)]
      (.addEventListener reader "load" draw)
      (.readAsDataURL reader (aget files 0)))))
This should allow us to upload an image.
Now we need to split it into tiles.
To do that, let’s add another button to our index.html:
<button type="button" id="split_to_tiles">Split to tiles</button>
In core.cljs we add another event listener:
(ns wfc.core
  (:require [wfc.sample :as sample]))

(defn ^:export init []
  (when-let [sample-input (.getElementById js/document "sample_input")]
    (.addEventListener sample-input "change" sample/upload))
  (when-let [tile-size (.getElementById js/document "split_to_tiles")]
    (.addEventListener tile-size "click" sample/split-to-tiles))
  (when-let [render-button (.getElementById js/document "render")]
    (.addEventListener render-button "click" render/render)))
And define the function that does the work:
(defonce ^:dynamic *sample* [])
(defonce ^:dynamic *tiles* {})

(defn split-to-tiles [_]
  (if (:image *image*)
    (let [canvas (.createElement js/document "canvas")
          _ (set! (.-width canvas) (:width *image*))
          _ (set! (.-height canvas) (:height *image*))
          ctx (.getContext canvas "2d")
          _ (.drawImage ctx (:image *image*) 0 0)
          hashes-imgs (for [x (range 0 (:width *image*) 32)]
                        (for [y (range 0 (:height *image*) 32)]
                          (let [img (.getImageData ctx x y 32 32)]
                            [(hash (vec img.data)) img])))]
      (set! *sample* (mapv #(mapv first %) hashes-imgs))
      (set! *tiles* (into {} (apply concat hashes-imgs))))
    (js/alert "Please upload an image first")))
We do basic error checking, that an image was uploaded by checking *image* to have anything under the :image key.
If there’s an image, we create a canvas, that we draw this image on, and then iterate thru it row by row, tile by tile, with a fixed tile size of 32.
In this loop, we get an array of pixels, representing the given tile, and we calculate its hash, which we will use in our wave function collapse algorithm.
Now we can upload an image, and split it into tiles, the only thing left is to actually draw the result!
Drawing the result
We need yet another canvas for that. Actually, we need only one canvas for all of this, as we have the input button that takes care of image loading, and another button for splitting. But I still like to see what sample is loaded, as it gives a better understanding of what the resulting image was constructed from. So let’s add another canvas and a button:
<canvas id="render_view" width="512" height="512"></canvas>
<button type="button" id="render">Generate</button>
Once again, let’s add a handler to this button in core.cljs:
(ns wfc.core
  (:require [wfc.sample :as sample]
            [wfc.render :as render]))

(defn ^:export init []
  (when-let [sample-input (.getElementById js/document "sample_input")]
    (.addEventListener sample-input "change" sample/upload))
  (when-let [tile-size (.getElementById js/document "split_to_tiles")]
    (.addEventListener tile-size "click" sample/split-to-tiles))
  (when-let [render-button (.getElementById js/document "render")]
    (.addEventListener render-button "click" render/render)))
And in render.cljs we need to define the render function:
(ns wfc.render
  (:require [wfc.sample :as sample]
            [wfc.wfc :as wfc]))

(defn render [_]
  (if (:image sample/*image*)
    (when-let [renderer (.getElementById js/document "render_view")]
      (let [ctx (.getContext renderer "2d")
            width (.-width renderer)
            height (.-height renderer)]
        (.clearRect ctx 0 0 width height)
        (solve ctx width height)))
    (js/alert "Please upload an image")))
Nothing too complicated, just a handler that clears the canvas and calls solve.
Now, solve is where the work is done:
(defn solve [ctx width height]
  (if (seq sample/*sample*)
    (let [tiles sample/*tiles*
          size 32]
      (loop [world (wfc/wfc (wfc/gen-world (/ width size) (/ height size)) sample/*sample*)
             x 0]
        (when-let [[row & rows] world]
          (loop [row row
                 y 0]
            (when-let [[cell & cells] row]
              (draw ctx (get tiles cell) x y size)
              (recur cells (+ y size))))
          (recur rows (+ x size)))))
    (js/alert "Please split image to tiles")))
First, we compute the result with wfc call, and then we iterate over it calling draw for each cell.
The tile is retrieved from the *tiles* variable, we’ve set in sample.cljs when we split the image.
The draw function is simple - it accepts an image, coordinates where we need to draw it, the size, and the canvas’ context.
Then it just draws the image:
(defn draw [ctx image x y size]
  (let [arr (js/Uint8ClampedArray. image.data)
        place (.getImageData ctx x y size size)]
    (.set (.-data place) arr)
    (.putImageData ctx place x y)))
The result will probably look a bit different, but the general idea is the same:
You can use this image to try the whole process:
Figure 4: coast
Alternatively, you can try other samples, just beware that the tile size is fixed to 32x32 pixels.
A proper demo
I’ve actually omitted some more things on the JS side, as the post already got a bit to long even after we’ve finished the algorithm. Things like configurable tile size, and custom world sizes, better error handling can be added, it’s just mostly the same stuff we already did for other buttons, and thus can get repetitive pretty quickly. So instead I’ve set up a separate page with a better visuals, tile picker, editor, some additional examples to try, and more robust error handling. You can try it here. And a bit more polished code can be found in the repo for that demo page.
I know that this isn’t how ClojureScript is used in production, but it’s still nice that you can build such pages pretty quickly, using your favorite language. In the future I’ll probably learn some proper frontend related stuff, like Lumen or re-frame, but this is a thing for another time. Hope this was an interesting read!
-
I’m saying lisp as in the language not as in concrete implementation. To be clear, I’ve worked my way thru SICP, and mostly used Racked or GNU Guile, not Common Lisp, so I’m not biased on what is lisp, and I accept Clojure as a valid dialect, even if some may disagree. ↩︎
-
This includes LÖVE Fabrik, raymarching, raycasting. ↩︎
-
This is the approach I’ve taken when I’ve implemented my first Scheme-like language, condition-system, a library for asynchronous programming, raymarching algorithm, and many other projects. I think I find this approach fascinating because when the thing finally works, and I go and look how it should be done, and see that I’ve got some things right, it gives me a lot of joy. This also trains to think outside of the box, and solve problems that you don’t exactly know how to solve. ↩︎